I asked my husband to go out and pick me up three pumpkins while he was out and about with the kids a couple weekends ago and they picked these beautiful pumpkins out! Such perfect size and shape! My daughters and I spent three evenings last week doing one pumpkin each night.
First, we started with a ribbon pumpkin. I saw this image on Pinterest:
 |
| Source |
These were our "halloween-y" choices for ribbon already in my stash. We ended up throwing the shiny white, sparkly gold, and the gray to the side.
We just cut lengths of the ribbon in a pattern. And started gluing. My daughter wanted to glue the top and I did the bottom.
And by some crafting miracle, we actually picked the exact right number of colors to repeat so that we made it around the pumpkin with three repeats without even really trying. I figured we would end up with an odd pattern where the end met up with the beginning. But that didn't happen!! :-)
The next night we experimented with pour paint pumpkins. I swear I saw this idea somewhere, but I can't find a pin for it on my boards so maybe I thought to do it on my own (though the idea itself is not original at all). We used this technique last spring when we made our pour paint flower pots. I just absolutely LOVE how this turned out!
All you need for this one is acrylic (or tempura paint works too) and a pumpkin. So easy!!
Keep pouring small amounts of color over and over again in the same spot and watch what happens! Less is more in this project. You will have to start pouring in a few different spots to cover the whole pumpkin.
We leveled out the bottom of our pumpkin by putting a toilet paper tube (squished) beneath it. So the pumpkin would sit evenly. I asked each girl to pick out 4 or so colors of paint from our stash and one sparkly paint.
Ella's blue/green section
Lily's pink/purple section
I filled in with "halloween" colors. :-)
This turned out sooo fun! I LOVE LOVE LOVE it! The flat acrylic paint dried matte and the glitter tempura paint dried shiny. Great play with texture and finish.
And our third and final "Pinterest" pumpkin was inspired from this post on The Swell Life blog. We have not done any melted crayon art yet. I've collected the random crayons around our house and I've even organized them into their color groups. But they have just sat waiting for me to decide what project to do. When I saw the melted crayon pumpkin, I knew that had to be our inaugural melted crayon project!I had the girls each pick our eight crayons. Then I broke them in half and took the paper off. I used Alene's Fast Grab Tacky Glue to adhere them to the pumpkin.
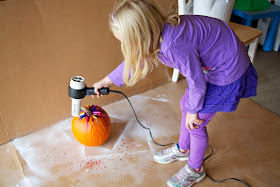
Then the girls each took turns using the blow dryer to melt the crayons. The funny part was I completely didn't realize we had the hair dryer on 'low' until we were almost done. But I think that actually ended up working well.
We were in our garage and it was a pretty chilly and windy day. So the cool air dried the crayon faster and the lower heat kept it from splattering so much.
We ended up with these really cool melted pieces that weren't even touching the pumpkin they cooled so quickly!
Perfectionist that I am, when I was photographing this one, I wasn't getting the light I wanted in the garage to do the colors justice so I braved the yucky weather and took some on the driveway. I really love these photos. I just love all the color pop!
And here's all three of our "Pinterest Pumpkins" outside (five days after we made them. Our weather has been so cold and dreary lately. Not conducive to taking photos!)
For me, these were soooo fun! And I love how all three of them turned out. So bright and colorful. I will definitely be doing more of these in the future. And we may have to venture into canvas melted crayon art too.


Love the painted one.
ReplyDelete