Tuesday, January 22, 2013

Sensory Activity: Playing with DIY Flubber

My son LOVED the slime we made together so I thought it would be fun to try something else similar. I had pinned this post from Teaching 2 and 3 Year Olds. The flubber post shows a lot of great ways to play with flubber, including coloring it with markers! I love that creativity and color can mixed in with sensory play. This is a very well-rounded activity as you can also practice cooking skills by letting your child help you mix up the flubber.
What you need to make Flubber (goop, gak, etc):
--Borax
--Water
--Elmer's Glue

Mix 2 cups Elmer's white glue with 1 1/2 cups cold water in a bowl. In a measuring cup, mix 1 1/2 cups cold water with 3 teaspoons Borax. Mix two solutions together until your flubber(goop) is mixed well. Store in an air tight container.

My son really enjoyed playing with this. The gems and plastic circles easily came out of the flubber when he was done playing with it.
This stored really well. We didn't play with it again for several weeks. My kids had Martin Luther King Day off of school. We got to the point in the morning where we needed to turn the tv off and do some sort of activity. My oldest daughter asked me if I had any fun sensory stuff for her to do. I thought of the flubber and brought it out along with the markers. My son joined in right away.
Even my middle daughter who usually doesn't join in on our sensory play for very long (she doesn't "need" it as much as the other two) had a great time with this activity. They really liked using the markers with it.
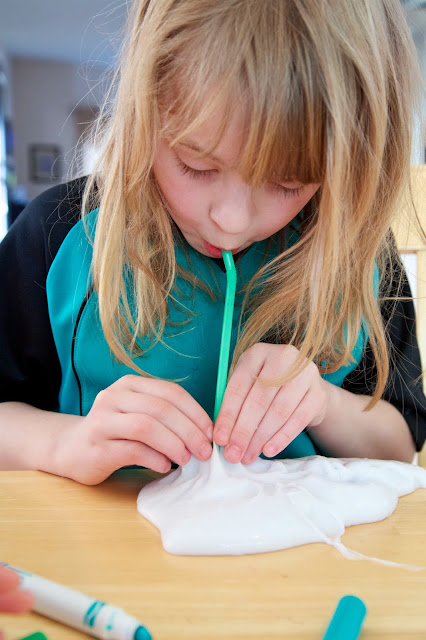
 Ella decided to try blowing into the flubber with a straw. It took a bit of experimenting to get it to work. She found she had to really wrap the flubber around the straw so no air could escape.
 Here it is at the end all mixed back together.
Honestly, this activity has a TON of applications. All sensory, part cooking, part science experiment, part art/creative project. LOVE IT!

Friday, January 18, 2013

Toddler Craft Activity: Mr. Potato Head

My son LOVES Toy Story. He loves all three movies, has tons of Toy Story toys and can spot a Toy Story character from a mile away. I've never really been able to get him interested in art/craft projects. However, he's been doing some little art projects at school and he seems to be quite proud of them. The projects were sitting either on our dining room table (our catch-all) or one of the kitchen counters. Multiple times he picked up his project and brought it to different people in the household to show them saying, "Mine". It was so cute!! He was so proud to show us what he made!

I decided maybe he was finally ready to try some more art/craft projects at home. But I knew I had to keep it interesting for him. So I decided to do something with a character he was familiar with: Mr. Potato Head. I cut out various pieces for both Mr. and Mrs. Potato Head.
I gave him both a glue stick and a small bottle of Glue-all. I wasn't sure which would be easier for him. We started with the Glue-all. He did a few pieces with my help. I verbalized the different body parts as he glued them on. I also showed him PECS (Picture Exchange Communication System) images of body parts. We used PECS with our oldest daughter when she was young and learning to talk (she has Apraxia). I happened to find these PECS when I cleaned out a closet recently and thought I'd give them a try with Kellan.
He didn't last long initially. He did the first few body parts and then got down and played in the family room.
 But he came back to finish Mr. Potato Head.
He got up again went and played for a few minutes, but was intrigued and came back for more. He decided to investigate the glue stick. He started touching it and digging his finger in it.
I've learned to be a lot more laid back than I was with the girls. There's a great blog called Play At Home Mom. They use the Reggio approach to their play and parenting. While I admire their method, it is a bit too free for me. But that's doesn't mean they don't have great ideas! I just recognize this type of parenting/learning would not work for me. I do not judge them and I think everything they do is fantastic. (Off the topic for a second, I find it so interesting how many people criticize the moms at Play At Home Mom on their Facebook page! Some of the comments blow me away. The boldness and pretentiousness of other people. Judging some really wonderful moms because they don't agree with what they are doing with their kids.)

One of the things these moms do is say "Yes" to their kids more often. They say yes to things that generally would make most parents tell their kids no (ie: letting their son throw sand in the air at the beach). All they ask themselves is "What will happen if I let my child do .....?" I admire how much they can let their children explore and investigate things by not restricting them. I also realize my son needs restrictions because he isn't fully aware of appropriate behavior yet and what may harm someone else. However, I do find myself letting him investigate things more than I would have in my younger mommy years. I would have been annoyed had my girls dug their fingers into a glue stick. Essentially wasting or ruining a perfectly good glue stick. However, now I just say, "what's the harm?" So what if I have to buy another glue stick? He is having a great sensory experience discovering that the glue stick is gooey and sticky.
It sticks to the paper. It's hard to lift off the paper.
Things stick to my hand because it's sticky:
Oh, things stick to it if I put them on the gooey stuff.
So, even though this little easy craft project didn't go exactly the way I pictured in my mind. We had fun and my son had a great time investigating and learning about glue. And look at the fun Picasso-ish Potato Head he did all on his own!

Craft Project: Girl Scout Swaps

My oldest daughter is going on her first Girl Scout overnight with her troop this weekend. This means time to make some SWAPS (Special Whatchamacallits Affectionately Pinned Somewhere). I pinned several examples to my Girl Scouts board on Pinterest and showed them to my daughter. She loved the lollipop SWAP.
I was thankful because this was an EASY SWAP to make and I had all the supplies already except the little pins for the back. You just twist two pipe cleaners together. Cut them in half and curve each half into a swirl. Cut candy sticks in half and hot glue to the back. Finally, hot glue a pin to the back.
Ella and I really enjoyed making these together! I'm excited to see what SWAPS she brings back home with her tomorrow! It's always fun to see what other people come up with.

Wednesday, January 16, 2013

Toddler Activity: Playdoh Invitation

My son likes playdoh quite a bit. But we both get bored just smooshing it and using cookie cutters with it. We have a couple Play-doh sets, but I get annoyed cleaning out all the crevices in those sets so they don't get dried doh in them. Pinterest has a lot of ideas for playdoh invitations to play. You can find some of them here. These have been inspiring for finding new ideas for play-doh play.

I also came across several DIY recipes for playdoh. It's super easy and super cheap to make it. The recipe I decided to use also incorporates kool-aid so it smells great too! And you know I'm always interested in adding in as much sensory material as I can in each activity!

Here's the recipe copied from Meet the Dubiens:
1 1/4 cups all-purpose flour
1/4 cup salt
1 pkg.(6 g) Kool-Aid Unsweetened Drink Mix, any flavor
1 Tbsp. Cream of tartar
1 cup boiling water
1 1/2 Tbsp. oil
wax or parchment paper
small airtight containers - I got mine at the dollar store

Make It:
MIX first 4 ingredients in large bowl. Add boiling water and oil; stir with fork 3 to 4 min. or until cooled, then mix with hands until well blended.
PLACE on waxed or parchment paper; knead until no longer sticky, adding additional flour 1 tsp. at a time if necessary.

Here is the invitation I set up for my son when he got up from his nap:
I made this playdoh around Christmas so I chose to use cherry Kool-aid and put red and and green beads in the invitation. My son jumped right in with this!
 Big sister got in on the action as well. They made quite the sculpture!
These photos were a couple hours later after dinner.
 Part of the fun for him was breaking all the long pasta noodles. Great sensory fun!
LOL! His face cracks me up in the one above.
And a couple days later he was still having fun:
Kellan keeps coming back to this over and over again, even a month later! I'll definitely make more of this in different flavors. It's a great activity to entertain him for a good bit of time.