Wednesday, April 18, 2012

Craft Project: Tissue Paper Bird Nests

I saw a cute idea on The Artful Parent blog to make tissue paper bird nests. A sweet idea to show off some of our decorated Easter eggs. The girls were pretty excited about this project too! So we picked up some tissue paper and I cut it into small squares.
Then I mixed up some Elmer's school glue with water. I tried to do equal parts but I was lazy and didn't measure anything out (this could be the reason for this project's downfall...read on).

Don't the girls have on super cute aprons?! I made them in about five minutes each out of reusable shopping bags. You can find the tutorial for them here. I didn't sew the ties on yet, but they worked just as well for this project without the ties. I will get them on eventually. :-)
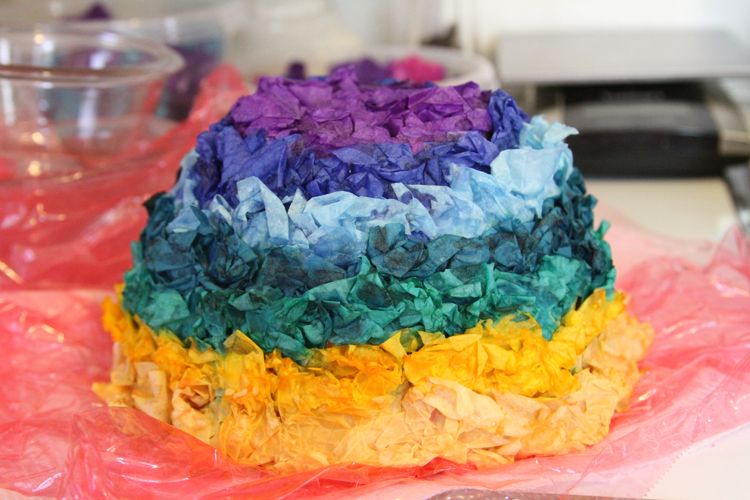
They just crumpled up the squares, dipped them into the glue mixture and placed them around an upside-down saran wrap-covered bowl. Here are the finished nests (mine is the yellow striped one).
We really enjoyed this project and had a lot of fun. BUT. They took FOREVER to dry. In fact, it just didn't seem like they would EVER dry. After 2 1/2 days! Now, my mom's house (where we made this project) is a bit on the humid side. But this was a bit ridiculous. I tried to move them along by using a hair dryer. And when it finally seemed that they were dry enough to remove from the saran wrap. This is what happened....
They completely flopped over. And my poor bowl went from this:
to this:
Sort of an epic fail there. The outside was dry, but the inside by the saran wrap was NOT. I ended up throwing mine away. And I put my girls' each in its own ziploc container and tried to reinforce it with straight Elmer's glue in the spots that weren't holding. I did this a few different times. And finally we ended up with this:
The end result turned out pretty darn cute. But getting there was a lot more work than I anticipated. What went wrong? Well, I'm pretty sure my first mistake was that I watered the glue down too much.  Secondly, I wonder if using Mod Podge would work better? I was also impatient with our drying time because I thought 2-3 days would be enough time for the project and we had to leave my mom's house. So I had to hurry it along a bit. I don't know if we'll try this again. Or what other improvements I could make. But not every project can go perfectly, right? It's all a process. And I sort of like that my girls got to see that the project didn't work very well, but I tried to come up with a way to...in the words of Project Runway's Tim Gunn, "make it work".

Monday, April 16, 2012

Toddler Sensory Activity: Play Foam (or Floam)

Have you heard of Zulily? It offers random items on clearance. Mostly clothes, shoes, etc. But sometimes it has toys, art supplies and books too! I had been contemplating ordering some play foam from Discount School Supply (DSS) because I thought it would be a good sensory experience for our toddler. But I wasn't sure how it was going to go over. Zulily had a whole pack of small pods on clearance and it was cheaper than the DSS foam so I jumped on it.
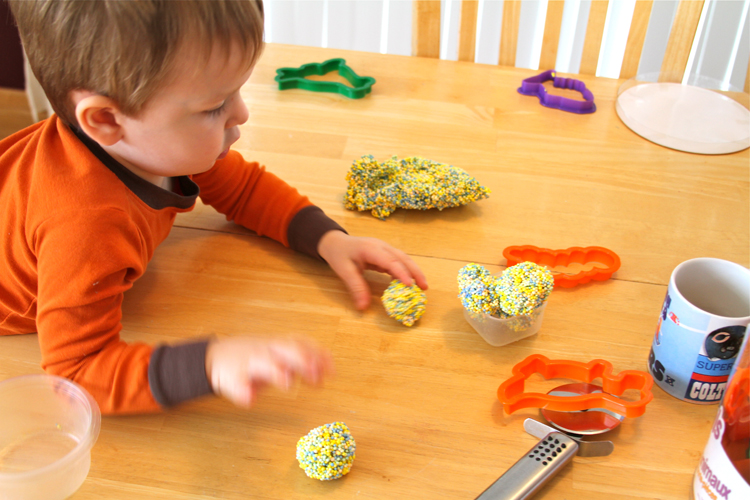
I wasn't quite sure what to expect. It wasn't as gooey as I thought it would be, which I think is sort of a good thing. Really you can just squish it around. I suppose you could build sculptures with it. But at age 2, I'm not sure my son is ready for that. Here's what we did do with it:
We used cookie cutters with it.
But I realized, we had to use large size cookie cutters. I wasn't thinking and tried to do our smaller letter cutters. I tried these before the larger cookie cutters. I thought it would sort of pop out of the cutter. Not so much. I had to use a toothpick to get it out of the "S".
The play foam definitely came out of the animal cookie cutters, much easier.
I rolled the foam into balls and he stacked them and squished them into plastic containers. But his favorite thing was when I gave him a metal pizza cutter to play with. He liked slicing through the flattened foam (no worries, our pizza cutter is as dull as can be!).
Overall, he enjoyed mixing the colors up. He enjoyed squishing it and cutting the foam. We probably played with this for about 25 minutes. I wish I could think of some other things to "do" with it. I would love to hear any ideas anyone might have. I'm not sure this is a 'must have' item for everyone's household, but it was fun to try out a new activity!

Sunday, April 8, 2012

Craft Project: Dyeing Easter Eggs with Tissue Paper

HAPPY EASTER!!!!

Last week, I found a post on The Artful Parent blog that showed you how to use bleeding tissue paper to dye Easter eggs. It looked super easy and I thought it might help make the dyeing egg process last a little longer for the girls.

Here they are dyeing the eggs with a regular egg kit:

 
The girls were pretty excited to try the tissue paper technique. They each picked three colors to use and I cut up little strips for them. Remember to use the BLEEDING art tissue paper.

All you have to do is dip the egg in water, put the tissue paper over it and then brush a little more water on over the tissue.
 Let them sit for a bit to dry and have the dye soak in.
 Then peel the tissue paper off....
 And there you go! I think the stripes turned out pretty cool!
I don't have any major tips to add to this project. However, I do wonder if you brushed the eggs and tissue paper with vinegar, maybe the colors would be even bolder? Maybe we'll have to try that next year.

Sunday, April 1, 2012

Craft Project: Tie Dye Easter Eggs

We created these super bright and fun Easter eggs for our deck window in the last couple weeks!
I combined two different ideas I saw on Pinterest to do this project. One from The Chocolate Muffin Tree where they made "tie-dye" Easter eggs (they used washable markers and sprayed them with a water bottle--a super fun idea!) and the other from the Mom to 2 Posh Lil Divas blog where they made hearts with the same technique we used below.
Just take a coffee filter and fold it in half or quarters. Use Do-a-Dot markers to make a pattern.
Even my littlest guy could do this project!


The girls used egg-shaped cardboard cut-outs I made to make the eggs on the coffee filters.
 Here they are drying!
And voila! Cut-out and hanging on our window. Do you see the little bunny one there with the striped ears? Isn't that cute? My daughter decided to use two smaller egg tracers and then added a face below them. So creative!

The only tip I might add to this is that the dot markers didn't go all the way through the coffee filter when we folded it in quarters. We had to go over the pattern a couple times. So I suggest either folding it just in half or not folding it at all. This project could definitely be used for just about any shape/holiday! My 6 year old especially loved this one and even made more of them with her friend during a playdate.

Friday, March 2, 2012

Sensory Light Table: A Cover!

My awesome father-in-law made this wonderful cover for our light table!

Isn't it great?!!! Now I don't have to worry about sand, salt, liquid or anything else getting under the plexi cover and onto the light panel. He measured it when he was here a few weeks ago and it showed up on our doorstep on Saturday. I was so surprised and excited to receive it.

Thursday, March 1, 2012

DIY: Discovery Bottle (Part 2) and Gel Board

Chasing Cheerios is a great resource of wonderful activities to do with your kids. Be sure to head over there and check her blog out! Her blog actually inspired us TWICE in the last week! First, I LOVED her Starry Night jar. Many people use these glitter/snow globe jars as calm down jars in place of time outs. They have their children sit and watch the glitter fall and once it reaches the bottom the child can get up and continue on with their day. I wanted to make one for a couple reasons. One, I loved that hers was a Starry Night jar and we could relate it to art and Van Gogh through the colors in it. And, I wanted to make another discovery bottle for my son (I have a plan for a few more liquid discovery bottles but just haven't had time this week).
I used a hot glue gun to seal the cap so my son couldn't get it open. :-)
All you need is glitter glue, glitter, clear Elmer's glue, and warm water. Mix all of these together in the bottle and shake. I shook often over several minutes to make sure all the glue dissolved well. If the glue doesn't dissolve (this is why you use warm water), I believe your glitter will get clumpy. I didn't measure anything out. Just sort of estimated the amounts. Glue is used to make the liquid a little thicker. This way the glitter takes time to fall to the bottom instead of just falling quickly after the bottle is shaken. My girls liked this so much they each wanted to make their own bottles. So we now have a sunset looking bottle in purple/gold and a magenta/purple bottle.

Then, I came across Chasing Cheerios' gel board idea linked from Dollar Store Mom. I thought my girls would LOVE this idea! And it's so great that it can be a gel board on one side and a dry erase board on the back. This project actually took me quite a bit longer to make (about 25 minutes each) than I thought it would. Here is what you will need:
When we need to mix glitter glue into something, I used our Lakeshore Learning Confetti Glitter Glue. It is a little more liquid-y and the kids love the confetti in it.
You will need about 5 oz. of hair gel (this took a bit of trial and error on my part to figure out the amount). I bought hair gel at Dollar Tree. Mix the hair gel with glitter glue, glitter, and food coloring. Carefully move the air bubbles up toward the top of the ziploc bag. Open the bag and gently force the air out. Use fun patterned duct tape (I found ours at Michael's) to attach the bag to a piece of foam core cut to the size of the ziploc bag. I made ours in gallon-size, but you could use quart-size to make them smaller and more portable (for restaurants or other places you may need something quiet to entertain your kids). If you want the back of the gel board to be a dry erase board, just add a piece of contact paper to the back side of the foam core before taping the gel bag. This was the part that took me a bit longer than I thought it would. I had a tough time getting the contact paper on straight with no bubbles or creases in it.

EDITED TO ADD: After playing with these for a couple days, I have two more suggestions to make them even better. I might use two pieces of foam core next time to make it a bit thicker and stronger. All our boards have bends in them already which isn't so pretty for the dry erase side of the board. The ziploc bags also have some crease marks and slight scratches in them. No holes for the gel to escape yet, but it made me nervous. So I added another piece of contact paper to the top for more protection. This step would be easier to do before the board was finished and squishy with the gel. I would suggest putting a piece of contact paper on the bag before filling it.
These can be used to practice writing letters or spelling words. Also great for just doodling with your finger or for kids that might need a sensory activity. Just pushing the gel/glitter around can be relaxing. Here are our boards in action: