We actually created this project months ago. The girls had a no school day back in February and I kept them busy with art projects that day. One of them was watercolor salt paintings! This is a relatively easy project to do and the girls really seemed to enjoy it! It would be a short quick-drying project to do as a birthday craft as well.
What you need:
--watercolors (I like liquid watercolors, I think they are much more vibrant)
--table salt
--watercolor paper
--blue painters tape (optional)
Start by having the kids block off a design on the watercolor paper with the blue tape.
Here are their taped off designs:
Then just fill in a section with watercolor paint. We found being liberal with the paint/liquid worked best. After doing a small section, sprinkle a little salt on the paint and move on repeating the process in the next area.
And here are the finished wet paintings with the tape still on:
My nine year old's:
My seven year old's:
Here is the one I made. :-)
And here they are with the tape removed:
And just for fun, here's a close-up:
This was a really fun project because not only is it artistic, but scientific too! I explained to them about how salt is a dessicant and sucks up the water/liquid. They thought this was such a neat thing to see! You can see the speckling happen as it dries.
Once the projects are dry, just remove the tape, brush the salt away and enjoy your beautiful artwork!
Every summer my kids and I work on one art project a week where they learn about an artist as well as various art techniques and concepts. Join us for our journey into art and art history! The rest of the year we spend crafting and seeing where our creativity takes us!
Showing posts with label Birthday Party. Show all posts
Wednesday, July 3, 2013
Monday, January 23, 2012
Birthday Party: Toy Story Alien Cupcakes!
My son's birthday was yesterday. I remember I paid $25 for a 1/4 sheet cake last year from the bakery to have a nice Woody & Buzz Toy Story cake. After the fact, I thought that was CRAZY! He turned two this year and I just didn't feel like going overboard for this birthday or spending that much on a cake. Not that it's not important...every birthday is important. I just know he's not going to remember this one and I guess I was feeling a bit lazy after all the holiday hoopla. I came across a photo of alien cupcakes from Toy Story on the Disney Family website. I have NEVER been a cake/cupcake maker. My past couple attempts at dealing with frosting have been dreadful! But these didn't look too difficult. And as a sidenote, my sister-in-law started a blog called "If I Can Do It, So Can You" She decided to start trying to do things out of her comfort zone (like sewing and scrapbooking). She actually does create amazing cakes (those are IN her comfort zone!). ;-) And she has made my daughters some really fun cakes for their birthdays. I decided to be inspired by her and do something out of my comfort zone.
Aside from the cake mix and frosting, here are my supplies (I cut up the extremes candy belt):
When I emailed my sister-in-law to see if she had any advice for me, she suggested I look for these candy eyes:
Image taken from the Wilton website.
They were met with a smile! So I think they turned out all right. Everyone seemed to enjoy them! And I feel like for me personally they were pretty much a cupcake success.
I thought I would also quick show our centerpiece for the table:
My daughter received this small claw machine for Christmas 2010 and usually it is for candy. But we thought it was fitting for this party. :-)
Sidenote: I know my posts of late have been a bit off track of the original art purpose for this blog, but I feel like they do fall into the "craft" part of Holly's Arts and Crafts Corner. Hope you don't mind the crafty diversion! :-) I will get back to our more educational art lessons this summer. I'm already making plans. I have some art book reviews to post soon as well.
Aside from the cake mix and frosting, here are my supplies (I cut up the extremes candy belt):


I found them at Michael's. Soooo easy! I also used the buttercream frosting recipe from the Wilton website thanks to her advice and it was DELICIOUS!! I used the tip of a leaf cookie cutter to make the ears.
Here's how they turned out:


Here's how they turned out:


Sidenote: I know my posts of late have been a bit off track of the original art purpose for this blog, but I feel like they do fall into the "craft" part of Holly's Arts and Crafts Corner. Hope you don't mind the crafty diversion! :-) I will get back to our more educational art lessons this summer. I'm already making plans. I have some art book reviews to post soon as well.
Sunday, January 22, 2012
Birthday Party Craft Project: DIY Angry Birds Game
At the same party for the girls where we made the painted canvases, we played a homemade Angry Birds game. Once again, thank you Pinterest! Inspiration for this game came from this post at Kara's Party Ideas.
We bought several of those cheapy colored plastic balls you find everywhere in summer. And I used acrylic paints to paint on the bird and hog faces. I mod podged over the faces several times because the paint kept cracking. I'm thinking if I were ever to do this again, I should maybe mod podge a base coat first. The paint just didn't want to stay on the ball when it was squeezed or thrown.
We set up cardboard boxes to look like the wood and ice (light blue painted boxes--left over from our basement bathroom paint).


The kids all had a blast trying to knock the structure down.

And everyone else had fun watching them play! The "big kids" meaning my husband, brother-in-law, and our friend had fun playing as well when the "little kids" were done. :-)
We bought several of those cheapy colored plastic balls you find everywhere in summer. And I used acrylic paints to paint on the bird and hog faces. I mod podged over the faces several times because the paint kept cracking. I'm thinking if I were ever to do this again, I should maybe mod podge a base coat first. The paint just didn't want to stay on the ball when it was squeezed or thrown.


Friday, January 20, 2012
Birthday Party Craft Project: Taped Painted Canvases
Every year we have a joint birthday for my two daughters because their birthdays are only two months apart in the year. That way grandparents only have to travel one time instead of twice. Last year, our girls were 6 years and 8 years and our party guests ranged from age 4 1/2 to almost 10 years. I felt like we were at a point where the kids were old enough to handle an art project activity at the birthday party. We they arrived, they found a place at the table I had set up on our deck (thankful for an August party date!).
It was nice, I knew our guests well enough to know what colors most of their bedrooms had so I put out colors that matched. Just in case they wanted to hang their creations in their room. :-) Each child received an 8 x 10 canvas (I purchased these in a value pack on sale at Michael's). I was inspired by this post I found pinned on Pinterest (image from pin below):
This project is soooo easy! Just have the kids tape their canvas with painter's tape. I made sure it was all firmly pressed down so the paint wouldn't slide under it. Then I gave them each the colors they wanted on a cheapy little plastic palette. We used mostly acrylic paints. We had some washable Crayola paints, but realized those did not cover quite as well as the acrylic. I bought the acrylic paints for a very reasonable price at Walmart, believe it or not.
They went to town painting!


The best part was, we could leave them on the table to dry because it was so warm out. At the end of the party, I took everyone's tape off and they had their party favor to take home! They seemed to really enjoy the activity and were proud to show off their artwork.
Here are the final pieces:


They went to town painting!


Here are the final pieces:

Friday, October 28, 2011
An Eloise Birthday Party!

This year, I went more overboard on the party decorations than I usually do because I was so excited about the theme! My daughter loves the Eloise books, she has blonde hair, and loves the color pink! AND she was turning six this year! All of this combined made me decide to do an Eloise-themed birthday party. Can I just say, I LOVE LOVE LOVE Pinterest! I never would have come up with any of these ideas without it!
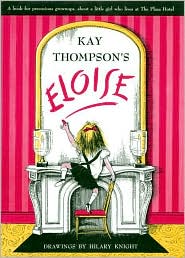
If you are not familiar with the 
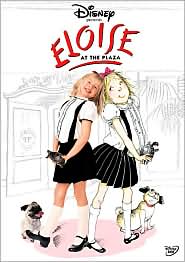
Eloise books and have a daughter in kindergarten, you definitely should check them out! Very cute! There are two movies on DVD as well that my daughter enjoys watching.
These two images on Pinterest definitely inspired me for the party:
I bought striped scrapbook paper just like this and copied the invitation almost exact. I used a circle scrapbook punch to cut out the circle and just cut a diagonal line to make the door hanger look like a door hanger.


The food for the party. Usually, we just order pizza and have go-gurt and juice boxes for our birthday parties. But, somehow, that didn't seem worthy of a Plaza hotel dinner. So I decided to do easy, yet fun and fancy food. I also considered the fact that the birthday girl has an allergy to peanuts. I made almond bark pretzels with pink sprinkles--using vanilla flavored almond bark that actually said on the package (NOT processed in a factory with nuts! Whoo hoo!).
Their appetizer was strawberries and grapes with strawberry shortcake yogurt cups to dip it in (totally stole this idea off Pinterest as well):
Then I made pizza bites both cheese and pepperoni. These are sooo easy. I was just hoping the girls would like them. And turns out they LOVED them! The recipe can be found at this link: Pepperoni Biscuit Bites.
Finally, in lieu of a cake, I decided to do something completely different! We have a great donut bakery near us called YoYo's Donuts. And it is completely peanut/treenut free! They've made donut cakes before, and originally I was thinking of getting a donut cake. But I wasn't sure what shape it should be in for an Eloise party. Then I thought of cake pops...and why couldn't we do donut hole pops! The bakery was kind enough to oblige my request!
They came to me just stuck in a styrofoam cirle. I added the ribbon around the bottom. Stuck tissue paper in-between the pops. Printed out a little Eloise on paper and stuck her in the middle. Volia! An Eloise donut pop centerpiece! I had them do a sprinkle covered long john as well so we would have something to put candles in:
We had a pinata for one of the games. And my 8-year old daughter actually came up with a party game all on her own: Pin the Bow on Eloise's Head! My husband printed this out on several sheets of paper and taped it together. I quick drew and cut out a bow for each girl with their name on it so we would know which bow belonged to which child.
I have to say. I had a fantastic time putting this party together. But I love doing this kind of thing. I wasn't sure how the "fancy" dinner would go over with six and eight year old girls. But they absolutely LOVED it! I got some feedback from a couple of the moms too. They both said that their girls had a great time and loved that it was quieter and not so crazy for a birthday party! In this day and age when I feel like most people do parties at bouncey places, Chuck E Cheese and the like (and there is absolutely nothing wrong with that. My kids love those kinds of parties!), it made me feel really good to know that kids can still have fun and enjoy a low key birthday party at our house! And I felt like all my effort was worth it and that Lily had a really fun 6th birthday.


Subscribe to:
Posts (Atom)