Showing posts with label Color Theory. Show all posts

Thursday, November 1, 2012

Holiday Toy GIVEAWAY: Mama May I Shop

I was first introduced to Mama May I's shop in 2010 when my friend Abbie at Greening Sam and Avery posted about her toys and held a giveaway. I was so drawn to Jessica's handmade products with their bright rainbow colors! I've admired her toys ever since! FINALLY,  now that my son is two and a half and I have a good idea of the kinds of toys that intrigue him, I bought three sets of her toys! I'm so excited for him to receive them at Christmas! He LOVES stacking things like blocks. He loves setting toys up and knocking them down. He will find toys not necessarily meant to be stacked or set up (ie: plastic bolts from our Design and Drill set are his FAVORITE!) and play with them multiple times a day.

As soon as I saw If a Tree Falls in the Forest, I knew he would LOVE it!!

 You can stack them!
 You can sort them by color and size!
And you can just simply play with them however you like!

Along these same lines, he likes to balance things so the Balance Set was another natural choice for him.
And finally, I purchased the Colored Cups and Balls set for him to work on his fine motor skills.
Do you see anything in common with all of these? They are beautiful! Aren't they?? Who wouldn't want to play with these? Also, they could all go together if you wanted in a color sorting way. Or you could sort them by size. Jessica's toys appeal to sensory play with their bright colors and smooth wood feel. You can add them to sensory bins either rainbow themed, or if you are doing a certain color theme like red and green for Christmas! Or they are absolutely wonderful to just set up for open-ended play and see what your child comes up with. She has several sets that would appeal to any child but also to little budding artists!


I have my eye on this Little Details Set too!
I think it would be really fun to have my girls create their own "sculptures" and then ask them to make line drawings of them! And my son could match the objects up with the cards provided. This set would be great for all three of my kids.

Here's a little blurb about Mama May I from her website:
Mama May i's handmade learning toys blend the best of developmental psychology and design to offer a unique learning through play experience.
Founder and principle designer, Jessica Perkins, has been creating for as long as she can remember, originally helping her mama with her handmade toy store over 20 years ago. With the birth of her children, and all the new little people in her life, Jessica found herself searching for toys that met her educational and design standards.


Inspired by these little explorers, and her understanding of Montessori and Waldorf methodologies, Jessica Perkins began making all of her creations with the belief that children make sense of their world through sensing their world. After years of making, creating, and gifting her creations to friends and family, Jessica decided to start selling her goodies. Since the launch of Mama May i in 2009, Jessica's passion for artistic expression through toys has blossomed into a business supported by mama's and papa's all over the world.


With this learning through play philosophy in mind, Mama May i encourages kids, both big and small, to dive in, make a splash, a scribble, or an inquisitive fiddle on the memories we share together.
While we don't follow the Waldorf or Montessori methods of play to a tee, I think some of the ideas based in them are really great. I have been trying really hard to add meaningful toys to my children's holiday wishlists this year. We have had the fad toys. We have had the toys with bright lights and loud sounds. I am tired of all the toys around here that my kids only use for five minutes after Christmas. I believe these toys fit the bill for fun, open-ended play and can be used for quite some time. Mama May I has toys ranging from newborn to grade school.

Now, here's the exciting part! You can win some of Mama May I's toys yourself! I have a set of If a Tree Falls..., a Balance Balls set, and a Colored Cups and Balls set to giveaway! There will be three winners; one winner for each set.

Use the form below between November 1st and November 23rd (Black Friday!) to enter. There are multiple ways to enter. Only US and Canada shipping eligible. And even if you don't win the giveaway, head over to Jessica's website to shop for some fun handmade, quality toys for your little ones for the holidays! Jessica has graciously offered a coupon for everyone! Use coupon code: ARTCORNER for 15% off your order. It will be active for 1 full week from the time the giveaway ends. 

Edited to add: Please copy your comment for the Rafflecopter form...in the post comments as well so everyone can see what items you love! Thanks!!!

***All images provided with permission from the Mama May I website.***

a Rafflecopter giveaway

Saturday, June 16, 2012

Art & Science Collide: Cloud Jars

Each week in the summer, we create at least one art project and we do one science experiment/project. I came up with Science Fridays last year and the girls loved it so much that I decided to do it again this year. Thanks to Pinterest I've found a bunch of new things for us to try.. Ironically, someone else does science on Fridays and calls is Sci-Fri (instead of Sci-Fi...isn't that great?!).

I came across this post about cloud jars on the Teach Preschool blog and even though it is easy and preschool level, I thought my girls would get a kick out of it too. I really think this can be fun for just about any age. Really, shaving cream? Of course it is going to be fun!
First we talked about a few of the different kinds of clouds including cumulonimbus clouds, which made us think of the scene from the movie Up! where Russell talks about the clouds. I tried to find it on You Tube to post on here, but couldn't come across it easily. ;-) After talking about the different kinds of clouds, we talked about how they were formed and how it rains.

Then we filled our jars with water, topped with shaving cream to make a cloud and proceeded to add "moisture" or liquid watercolors to the clouds. When the clouds were filled with too much moisture, it began to "rain" watercolors into the water. They thought this was so fun! They each did two jars worth before we moved on to making messy shaving cream art.
A quick note on the plastic droppers I got from Discount School Supply company (along with the liquid watercolors). They float when you leave them in the paint bottles! It was great! The girls could just leave them sit in the top of the bottles so we didn't have to worry about getting the colors mixed.
They really loved this! I think they could have made jar after jar and still be entertained. You could also turn this into a color theory lesson about mixing colors to make new colors. It was a great project to do on a rainy, yucky summer morning.

Friday, April 27, 2012

2012: Element Project: Color/Value Project (sort of)

Our other project last weekend was more complicated and more involved than many of our more recent creations. I was going for a project that might take a bit of time to complete while my youngest child napped. This project is conducive to talking about some of the Elements of Art: shapes, color, value, space, and line. We created these lovely paintings that I put up on our art room wall:
Top: My 6 year old's, Middle: My 8 year old's, Bottom: Mine :-)
We kind of combined two projects I found. One project inspiration has a similar layout to what we created but was about color value (the light and dark of one color). You can see in the photo above that I tried this project as it was supposed to go with my purple circle picture. But as many projects go, we had to adapt and change as we went along. The other inspiration came from the Art is the Best Part of the Day Blog. In their project, they picked two primary colors and created analogous color images and added white along the way to lighten some of the colors.

Okay, let's start with the first part of the project. Creating a shape and lines.
We used a ruler, pencil, and oil pastel to make a shape in the center, then drew only vertical and horizontal lines to fill in the paper. I experimented with black crayon and pastel and thought the pastel would resist the paint a bit more. So we went with that. I'm sure black crayon would work almost as well and be a cleaner alternative.
My original plan was for us to use one color and just keep adding white to create a color value image. However, this was the first time we used our new Biocolor paints. I experimented with the paint a bit while the girls were busy drawing their shape and lines. I was a little disappointed in how the paint covered the space on the page. It was not nearly as opaque as I was hoping for. And you could really see the brush strokes. Also, when I mixed in the white, I had to mix in a LOT of white to get a significant enough value change to show up on the paper. After discovering all this, I decided it would be better for the girls to pick two colors and mix them to create analogous color paintings instead of value paintings.
Isn't it cute how hard they are concentrating and how thoughtful they are while they are working? :-)
Here are their finished paintings:
Lily picked magenta and yellow. I had her paint 8 spots with each raw color. Then I had her mix those two to get an orangey color. After that, she mixed white with each of the three colors to get a lighter version. Hers worked out pretty well!
Ella picked turquoise and red. But when we mixed the two together, we did not get a purpley color as we thought. We got more of a gray muddled color. So she "cheated" a bit and just used the purple paint to fill hers in. She also added white to the three colors to get different values.
Here is my "value" painting. I added a bit of black to get one shade darker than the raw purple color from the bottle. And then I added white several times to get the lighter shades. I also went over my color blocks 2-3 times with the paint drying in between each time. This gave it a much more opaque finish and didn't look quite as watercolor-y. Although, I was a bit disappointed and frustrated at first (I didn't show this to the girls), we adapted the project and it worked out. Now, we have some nice artwork for the art room wall. Once it was underway, this was a fun project.

Thursday, February 23, 2012

DIY: I Spy Bags and Discovery Bottle, Part 1

I saw an I Spy bag in a fun educational store near us. When I looked at the price I gasped! $18! Especially because many of the objects in the bags were things I could find around our house! I really couldn't justify paying that and figured I could definitely make something similar. Searching Pinterest for "I Spy" or "Discovery bottle" will get you many options.

I happened to be in Dollar Tree today and they have zippered pencil bags with a vinyl window in them. PERFECT!!! For only $1! When I finished at Dollar Tree, I headed to the grocery store and picked up some rice for $1.39. I searched around our house and found a TON of little items I could put in I Spy bags or bottles.
 
 
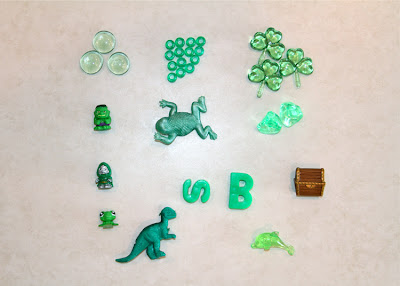
I decided to do a green bag with a bit of a St. Patrick's theme, an ocean themed bag, and a warm colored I Spy bottle. I still have items set aside for a cool colored bottle and a rainbow themed bottle (Part 2 of this post).

For the ocean themed bag, I added some blue food coloring to the rice:
 
I took photos like this of the items in each bag. I broke them down into smaller groups to make it easier for my son. So I have a larger photo of all the items (to make it harder when he gets older) and then will print these as cards for him to use with the bags.
  
For the last bottle I made today, I used dry great northern beans. I actually sort of like how this works a little better than the rice. The objects seems to flow in and out more smoothly. And the bottle with beans seemed to appeal to my 2-year old more. Maybe the added sensory experience of the noise of the beans when you shake it helped hold his attention a bit more. My 6 and 8 year olds seemed to like these as well. You could make the experience a little more advanced for them by telling them to look for something that starts with an "l" in the bag (ie: ladybug).


I haven't done it yet, but I plan to hot glue the lid of this bottle and I saw a tip here that you can hot glue the zipper of the pencil bag. I was trying to think of a way I could secure the zipper. I do sort of want to reuse the bags if I can so I may test the glue on one bag and see if I can peel it off again to re-do the bag.
 
I'm definitely looking forward to making some more discovery bags and bottles! Maybe some involving liquid. And I found enough items today to put together a halloween discovery bag this fall. I didn't buy the black pencil bag. I may have to go back and get one. ;-)

Wednesday, February 22, 2012

Toddler Activity: Learning Colors Through Play

Image from Color Maniacs
You're never too young to start learning colors! And actually, it would be quite a feat for me to teach my 26 month old colors at this point because he is still mostly nonverbal. Even though he only says a few words, he is successfully using the sign for "more" so I'm trying to teach him a few more signs. Only really elementary signs because that is the extent of my sign language knowledge. We're working on 'please', 'thank you' and a few other things. And I'm throwing colors in there too. It would be so cool if he could know his colors by signing and sorting before he can even say the words.

I've approached this in two ways. I started to focus on one color every week or so and I pull toys from our stash that are that color and set them aside (he doesn't see them unless we're doing this activity). I try to pull them out everyday for him to play with. He's not one for sorting or really investigating. He just wants to DO something with them. So I came up with having him drop them in the hole in the bottom of a diaper box and also use the slot in a toy mailbox we have. He loves trying to see if the pieces fit. As he's dropping them in, I say things like, "You have the red block. You're dropping the red block into the box." And as I say the color, I sign it. The awesome thing is that if you don't know sign language you can just google the word you're looking for and find out what the sign is, just like that!
I got the white basket and the pipe cleaners (on the table in the background) at the dollar store. I have him slide the pipe cleaners into the side of the basket. I love that there are different size holes so right now he can put them in the larger ones. As his fine motor skills get better, he can try for the smaller holes.

Another activity that he REALLY seems to like is playing with Prism bricks on the light table. If I give him the whole set he tends to just throw them around (I think this is his way of telling me he's overwhelmed). So I've just been giving him the 2 x 2 bricks. He loves to stack them up over and over again. He also just puts them all one by one on the board that comes in the Prism brick set. As he stacks each brick, I sign and tell him the color.
  
You could also talk about color mixing with the blocks (primary colors, secondary colors, complementary colors).
You can go over the colors of the rainbow.
 
It's funny, we have a ton of Duplo and Mega Bloks that he has never really seemed interested in. But the Prism Blocks seem to hold his attention. Maybe it is the added sensory experience of the light table with them.
I realize that these activities are not innovative in the world of toddler activities. And I know some people do these sorts of things with their kids from the time they are babies. But he is a third kid and was very happy to just play with whatever was around him until he turned 20 months or so. So I just went with it. And now that the girls are both in school all day, I have more time to do these things with him. He also had absolutely no attention span for anything remotely constructive (or maybe it just took me this long to figure out how to engage him for longer than 30 seconds) until recently. He will do these for at least 20 minutes at a time.

What do you do to introduce color to your little ones? :-)