Showing posts with label Kindergarten. Show all posts

Friday, August 31, 2012

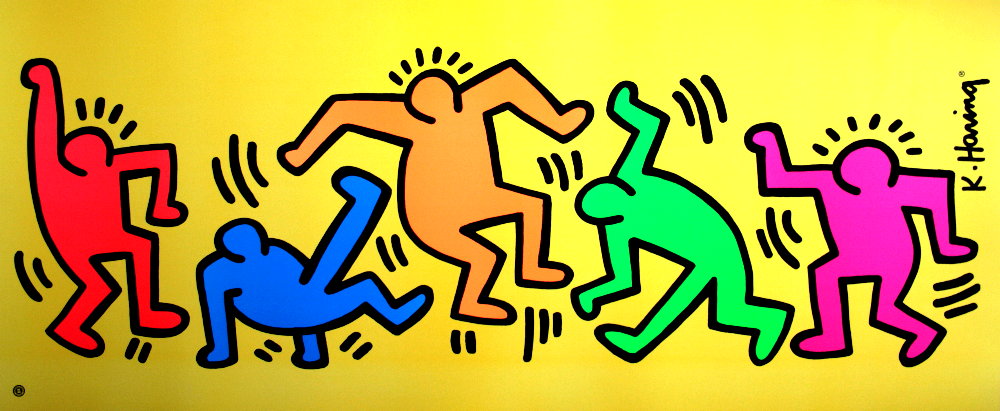
2012: Project 5: Keith Haring-Inspired Figures

I was so excited about our art projects this summer and I have to admit after the bird camp (which I still need to post about) we kind of fizzled out. Or maybe I did. Or maybe we just were so busy with other things there just didn't seem time. So overall, we didn't get as many projects completed this summer as I hoped. But the girls have consistently used the art room on their own and created some of their own projects. I sort of went with it and just let them be creative too. I didn't want to always direct them in a certain way.

With all that being said, one of our organized projects was inspired by 80's pop artist Keith Haring. We looked at several pieces of his artwork:
Source
Source
Source
Source
Source
After showing the girls some of Haring's art, I asked them what common elements they saw in his work. They said things like bright colors, people, designs. Here is what we wrote on our chalkboard as we talked about his work:
I also showed them how to draw the figures in his style. We started with the head, then neck, arms, torso, legs. There are MANY Haring art projects for kids out there in the blogosphere. I showed the girls a few different projects. And they were most inspired by this image on Artsonia.
My 8 year old LOVED this project! My six year old I think was a bit overwhelmed at the thought of all the lines she might have to draw so she just filled hers in with shapes. :-)
 First, they drew three figures with pencil, then started outlining with marker.
 My 8 year old decided to use warm colors for the people and cool colors for their motion lines.
 My six year old just colored however she wanted. ;-)

And here are their finished Keith Haring projects:
 I LOVE how they turned out!

Saturday, June 16, 2012

2012: Project 1--Self Portraits

I was pretty excited to get our art history projects under way this summer. I always start off with the same project each year: a self portrait. I've learned over the last couple years that the girls do much better with these projects if they are well rested. I was reminded of this once again as they each had a mini-meltdown during the course of this project. It was a Monday after three days of being up north with my husband. Kind of my fault. I should have planned that a bit better. But oh well. We reviewed the images I showed them last year for art historical self-portraits. And then I showed them a few doodle pages. I told them they could make a portrait with a "real" background or one that was something imaginative.
Despite some of the drama that occurred during the project, they turned out pretty cute. In the future, I might limit the use of the Crayola Slick Stix just because they are so thick and messy and I think my younger daughter's picture would have had a totally different feel if I hadn't let her color the sky and grass with them. But I'm always torn with letting them roll with it and giving them direction.

My six year old's...she's in our backyard and though it's hard to tell below, she even put in some of the pine trees. It was fun, she asked me to help her draw pine trees. So I showed her how to make a trunk and some hash marks for the needles. She was so proud that she could make pine trees that weren't just a triangle or look like Christmas trees.
My eight year old's...she obviously went with the imaginative route for her background. She didn't originally have sunglasses on. But she didn't use a thin enough marker and her eyes ended up looking like she had goth makeup on. She was really upset how they turned out so we "fixed" it by turning them into sunglasses a la "Beautiful Oops". ;-)
I like to do this project each year just to give them the same set of instructions and see what they do with them from year to year. We'll see how our next art history related project goes.....in the meantime, we have been having fun with some liquid watercolors and kool-aid!

Tuesday, May 15, 2012

Craft Project: Pour Paint Flower Pots

What a fun project this was!! Along with the alcohol ink coasters we made, we created some pour paint pots to also give the girls' teachers. This project was sooo easy! Though it did take a tiny bit of experimenting to get the whole flower pot covered, but if you aren't particular about the outcome, it's so easy!

These two posts inspired us from Dilly-Dali Art and In Lieu of Preschool. Both of their projects turned out amazing! They created larger pots than we did. Ours were just 3" diameter terracotta pots, perfect for a pencil holder (or a very small window sill plant).

Here's what you need:
 I got both the metallic and glitter Creatology Tempera Paint from Michael's. This paint worked AWESOME! I highly recommend it.
I taped the hole in the bottom of the pot. You'll see later in the post, but once you start pouring the paint, it seems as if you'd never be able to get the tape off. The paint is so thick. But once it is dry, the paint really thins out and you can easily remove the tape.
I learned from Genny at In Lieu of Preschool that suspending the pots works well. And boy does it! We used our Colorations BioColor paint bottles to suspend the pots. You'll see in other pictures, I wrapped a paper towel around the bottle before putting the pot on and it worked really well!

I was able to do this project one on one with my girls, which I think was a good thing in hind sight. Both Aleacia from Dilly-Dali Art and Genny advised that less is more when it comes to squeezing the paint. I think if both girls were doing this at the same time, we would have had more paint poured than we needed. :-)
All you have to do is pick your colors and start pouring them one by one into the center of the pot. As the paint covers the bottom of the pot, it will begin to pour over the side in layers.
 
My older daughter (pictured above) didn't want me to help at all so I just let her go and didn't offer any suggestions or anything. My younger daughter was a little more amenable to my suggestions. Instead of just letting the paint fall where it wanted, we let it pool a bit.
Then I picked up the paint bottle it was suspended on and tipped it just a bit to get the paint to cover the bare spots on the pot. We repeated this technique a few times to get most of the pot covered.
 

We went from this:
To this:
I absolutely LOVE LOVE LOVE how they turned out! We will definitely be doing this project again. Quick, easy, and beautiful result!

Wednesday, May 2, 2012

Craft Project: Alcohol Ink Tiles Part 2: Children's Experimenting

After experimenting with the alcohol ink myself for a bit, I felt like I could do this project with my girls. I decided it was best to do it on a one-on-one basis with them though. I thought it might be too much to try and help both of them at the same time since you are sort of under time constraints with the drying of the ink and Alcohol Blending Solution. I also wanted to monitor the squeezing of the ink since it isn't exactly cheap. :-)

I started with my 8 year old and showed her the tiles I had created and asked her which "style" she wanted to try first. She picked the "bubbles" one. So I had her spread the Alcohol Blending Solution on the tile with a toothbrush and pick out three colors of ink.
She did a really wonderful job of listening to my instructions and not getting overzealous with anything. She was really thoughtful about where she placed the ink and was very patient to watch what happened when she put the dots on. It really is sort of mesmerizing to watch.
And here is her first finished tile:
Isn't it fun!
She really got into the PROCESS of this project. She LOVE LOVE LOVED trying different techniques and seeing the outcome. 
She really started experimenting with one tile. She decided to try the ink without any Alcohol Blending Solution. She played around with dropping the different colors into each other. And then, most impressive to me, she figured out that if you put drops of one color of ink on a Q-tip and rub it on a different color you can draw with it! See the swirls of new color in the photo below:
 
She taught me something about how the alcohol ink works! Her tile ended up a total muddy mess by the the time she was done experimenting. But we had learned a few new techniques so it was great! We just rinsed off the ink with the Alcohol Blending Solution and started anew!
She also tried out stamping on a couple of her tiles: 
Here are the tiles she created:
That last one on the right will be making an appearance in the 
"Masters" tiles post (Alcohol Ink Part 3). ;-)
(Edited to add the photo below. She decided to add a stamp to the blue/green tile)
After trying the project out with my 8 year old, I felt even more confident that my 6 year old could handle this project also. And she had some fabulous ideas as well! She started off with just dripping drops of ink on the tile. But quickly moved to taping her tiles. This first photo, she wanted to make a "snowflake" with the tape.
 And I have to admit I thought of doing a rainbow one, but she loved the idea and ran with it:
Here are her finished tiles:
GORGEOUS!!

(Edited to add: She made a couple more tiles yesterday. :-)
She kind of went overboard with the ink on one tile. When I was in the process of wiping it off so she could start over, she really liked the blue background. So we kept it!
 Aren't the flower stamps cute?!
Now, I bet you're wondering what the heck we're going to do with all these tiles?! We're going to coat/seal them to protect them (Alcohol Ink Part 4). We will attach felt or cork pads on the bottom to make into coasters and we plan to give them to some special ladies as Mother's Day gifts. I also plan to give each of their teachers one, along with a little painted flower pot as End-of-the-Year teacher gifts (Something along the lines of "Thanks for helping me "grow" and "coast" through this school year!").

Now, for something really fun....check out our Mini Masters tiles in the next post!