Showing posts with label Second Grade. Show all posts

Tuesday, January 28, 2014

Product Review: Master Kitz Paint Kits

I came across these kits quite some time ago at the Creative Kidstuff toy store. They looked so neat!
Source
I received one for Christmas a couple years ago and one of my daughters received one for her birthday. This summer we decided it was time to break these out and give them a try. Unfortunately, I do not have a lot of in-progress photos of both kits. But here it goes:
The first kit we did was the Starry Starry Night Kit. The kits come with the instructions, paint, applicators, paper, and stickers provided. All you add is the newspaper and creativity. The instructions are easy to follow and very visual so an older kid could definitely do this on their own without much supervision. The thing I think is really neat about this is that it introduces kids to layering paint. Admittedly, I've never actually taken a painting course (just other generic art courses) so my knowledge is limited to what I've observed. But I do know that artists paint their images in layers and this is a great way to teach kids about layering color together!

The way the Starry Night kit works is that you place removable circle stickers down, then apply different shades of blue paint with the stamped roller applicator included. You remove the stickers and tape down a stencil. You roller black paint over the stencil to create the town. Then using your own creativity you layer on pastel color to create the details of the stars and town. Here is my 10 year old's version of Starry Starry Night:
I absolutely LOVED how she didn't just copy what she saw on the box. She created her own masterpiece with her own color choices. She asked to use our pastel colors so she would have a wider variety of color to pick from than what was included in the kit.

I give this kit FIVE stars and HIGHLY RECOMMEND IT! Here are a couple more details:
Another thing I truly love about this kit is that there is great TEXTURE in the paint application. Just like Van Gogh's work!
I visited New York City this past spring and had to see MOMA. I can't tell you how excited I was to see Starry Starry Night in person and to be able to get up close and really "see" it!
But to be honest, I kind of like my daughter's version better. Ha! ;-)

Now onto kit #2: Gustav Klimt's Tree of Life. I have more in-progress photos for this one:
This kit was admittedly, quite a bit less involved. You placed the stencil over your paper to start. And then apply the included gold paint with the roller brush.
After that, you use a darker brown and stamp over the gold paint:
This created patterns and shapes on the gold paint.


You remove the stencil and add the included stickers wherever you like. And then you have a finished Tree of Life!
And here they are on our art wall:
All right, I'm going to be 100% honest here and say, the Tree of Life kit was kind of a disappointment TO ME. Now, my 8 year old daughter enjoyed it. But when the PROCESS of this kit is compared to the process of the Starry Starry Night kit, the Tree of Life kit was a letdown. There were more steps in the Van Gogh kit and there was more room for the child to be more creative.

I think the Tree of Life kit is perfect for ages 6 and younger. I think the Van Gogh kit is better overall for any age (with help). But especially for ages 6 and up. I'm glad I wasn't having my 10 year old do the Tree of Life kit or I think she would have been easily bored with it. The only complaint I had about the quality of the kit is that our black paint in the Van Gogh kit was unusable. It was very clumpy and you could tell just sort of old. Luckily I had some black acrylic paint here so it wasn't a problem for us. But for someone using this kit that doesn't have access to a fully stocked art room like we do, it would have really changed my perspective on the kit.

Overall, not a bad gift idea for a creative gift. But I definitely recommend the Van Gogh Kit over the Klimt kit. I would be curious to try the Water Lilies kit and the Matisse kit just to see what the process was like for those kits. Anyone out there try those?? What did you think?

Monday, January 27, 2014

Polar Vortex: Playing Catch-Up

Well, if there is any advantage to living in the Polar Vortex in Minnesota, it's that I have a little time to try and get caught up on 6 months of blog posts. Or at least attempt getting started writing posts. This first post is just a catch-up post of a couple projects to ease my way in. ;-)

First, here's a duct tape notebook my 8 year old made all on her own last summer. She didn't look at anything on Pinterest or online. Just had the picture in her head (my little right-brained learner!) and created this!
Look at that ear detail! It's 3-dimensional!

We had a wonderful nanny last summer and we made these fun little gifts for her as thank you gifts:
She was heading to Virginia Tech for school so we attempted to make her a rainbow loom bracelet in the right colors (really the school color is a little more maroon, but I digress). I just gave the girls some 5 x 7 canvas boards and asked them to make a fun picture, but that I wanted them to use different lines and patterns so here's what they came up with. They used permanent markers to color these.
The bright colors and happy drawings make me think of summer and warmth! :-)

My girls school has an art class once a week after school. Each girl will be artist of the week once during the term. Here are the girls' artist of the week creations for the fall:
These paper sculptures were really cool! I love the 3-dimensional quality of them!
(Sorry the quality of the photos isn't the best, I took them on my iPhone). ;-)

Friday, August 31, 2012

2012: Project 5: Keith Haring-Inspired Figures

I was so excited about our art projects this summer and I have to admit after the bird camp (which I still need to post about) we kind of fizzled out. Or maybe I did. Or maybe we just were so busy with other things there just didn't seem time. So overall, we didn't get as many projects completed this summer as I hoped. But the girls have consistently used the art room on their own and created some of their own projects. I sort of went with it and just let them be creative too. I didn't want to always direct them in a certain way.

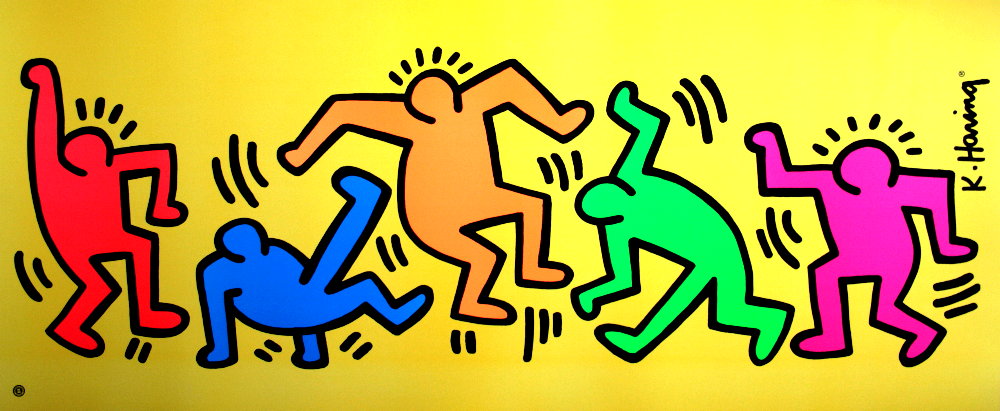
With all that being said, one of our organized projects was inspired by 80's pop artist Keith Haring. We looked at several pieces of his artwork:
Source
Source
Source
Source
Source
After showing the girls some of Haring's art, I asked them what common elements they saw in his work. They said things like bright colors, people, designs. Here is what we wrote on our chalkboard as we talked about his work:
I also showed them how to draw the figures in his style. We started with the head, then neck, arms, torso, legs. There are MANY Haring art projects for kids out there in the blogosphere. I showed the girls a few different projects. And they were most inspired by this image on Artsonia.
My 8 year old LOVED this project! My six year old I think was a bit overwhelmed at the thought of all the lines she might have to draw so she just filled hers in with shapes. :-)
 First, they drew three figures with pencil, then started outlining with marker.
 My 8 year old decided to use warm colors for the people and cool colors for their motion lines.
 My six year old just colored however she wanted. ;-)

And here are their finished Keith Haring projects:
 I LOVE how they turned out!

Saturday, June 16, 2012

2012: Project 1--Self Portraits

I was pretty excited to get our art history projects under way this summer. I always start off with the same project each year: a self portrait. I've learned over the last couple years that the girls do much better with these projects if they are well rested. I was reminded of this once again as they each had a mini-meltdown during the course of this project. It was a Monday after three days of being up north with my husband. Kind of my fault. I should have planned that a bit better. But oh well. We reviewed the images I showed them last year for art historical self-portraits. And then I showed them a few doodle pages. I told them they could make a portrait with a "real" background or one that was something imaginative.
Despite some of the drama that occurred during the project, they turned out pretty cute. In the future, I might limit the use of the Crayola Slick Stix just because they are so thick and messy and I think my younger daughter's picture would have had a totally different feel if I hadn't let her color the sky and grass with them. But I'm always torn with letting them roll with it and giving them direction.

My six year old's...she's in our backyard and though it's hard to tell below, she even put in some of the pine trees. It was fun, she asked me to help her draw pine trees. So I showed her how to make a trunk and some hash marks for the needles. She was so proud that she could make pine trees that weren't just a triangle or look like Christmas trees.
My eight year old's...she obviously went with the imaginative route for her background. She didn't originally have sunglasses on. But she didn't use a thin enough marker and her eyes ended up looking like she had goth makeup on. She was really upset how they turned out so we "fixed" it by turning them into sunglasses a la "Beautiful Oops". ;-)
I like to do this project each year just to give them the same set of instructions and see what they do with them from year to year. We'll see how our next art history related project goes.....in the meantime, we have been having fun with some liquid watercolors and kool-aid!

Tuesday, May 15, 2012

Craft Project: Pour Paint Flower Pots

What a fun project this was!! Along with the alcohol ink coasters we made, we created some pour paint pots to also give the girls' teachers. This project was sooo easy! Though it did take a tiny bit of experimenting to get the whole flower pot covered, but if you aren't particular about the outcome, it's so easy!

These two posts inspired us from Dilly-Dali Art and In Lieu of Preschool. Both of their projects turned out amazing! They created larger pots than we did. Ours were just 3" diameter terracotta pots, perfect for a pencil holder (or a very small window sill plant).

Here's what you need:
 I got both the metallic and glitter Creatology Tempera Paint from Michael's. This paint worked AWESOME! I highly recommend it.
I taped the hole in the bottom of the pot. You'll see later in the post, but once you start pouring the paint, it seems as if you'd never be able to get the tape off. The paint is so thick. But once it is dry, the paint really thins out and you can easily remove the tape.
I learned from Genny at In Lieu of Preschool that suspending the pots works well. And boy does it! We used our Colorations BioColor paint bottles to suspend the pots. You'll see in other pictures, I wrapped a paper towel around the bottle before putting the pot on and it worked really well!

I was able to do this project one on one with my girls, which I think was a good thing in hind sight. Both Aleacia from Dilly-Dali Art and Genny advised that less is more when it comes to squeezing the paint. I think if both girls were doing this at the same time, we would have had more paint poured than we needed. :-)
All you have to do is pick your colors and start pouring them one by one into the center of the pot. As the paint covers the bottom of the pot, it will begin to pour over the side in layers.
 
My older daughter (pictured above) didn't want me to help at all so I just let her go and didn't offer any suggestions or anything. My younger daughter was a little more amenable to my suggestions. Instead of just letting the paint fall where it wanted, we let it pool a bit.
Then I picked up the paint bottle it was suspended on and tipped it just a bit to get the paint to cover the bare spots on the pot. We repeated this technique a few times to get most of the pot covered.
 

We went from this:
To this:
I absolutely LOVE LOVE LOVE how they turned out! We will definitely be doing this project again. Quick, easy, and beautiful result!