Showing posts with label Elements of Art. Show all posts

Monday, July 16, 2012

2012: Project 3--One Point Perspective

I felt like my girls were ready for a bit of a drawing lesson as opposed to just learning about various artist's styles and techniques. So we tried one-point perspective a couple weeks ago after I found this great lesson from the smART Class blog.

I started off showing them a bunch of different artworks from different time periods. We started with some photographs I found through google images (sorry for the lack of source info, I just googled "perspective photos" and I will post some links at the bottom of this).
 I started by talking about specific terms with them: perspective, horizon line, and vanishing point.
Then I showed them the image below and how all the lines in the image all lead to the vanishing point.
I showed them all the following images, asking them to point out the horizon line and vanishing point. I pointed out the sky, ground, buildings or trees on the sides of the images.
Then I got a little tricky with the next two, but my smarties got that the vanishing point wasn't always in the same spot. ;-)
 To the left in the boat image and in the middle in the image below.

I showed them some Renaissance art paintings:
Raphael's "School of Athens", 1518
DaVinci's "Last Supper", circa 1495
Then we moved on to slightly more modern art:
Edvard Munch's "The Scream", 1893
And one of my favorite artists, Edward Hopper
Edward Hopper, "Gas", 1940
Edward Hopper, "Chair Car", 1965
Finally, I showed them images from the smART class blog assignment dividing the paper into four quadrants separated by diagonal lines.
 After the girls made their diagonal lines, they filled in the right side with buildings...

 ...the left side with trees....
 Then sky in the middle on the top and a street in the middle on the bottom.
Hard at work in the art room.
Lily's perspective drawing! She's only 6 years old  (almost seven) so I didn't get particular about showing her the horizon line.
 And here's Ella's! I pointed out the horizon line to her and she grasped the idea pretty easily.
They really liked this project and have made pictures with this same technique since we've done this. A success as far as our summer projects go!

Saturday, May 26, 2012

2011: Project 11--Mandala Drawings

Playing a little catch up today. I'm spending some free time getting prepped for our art projects this summer and realized I didn't post this mandala project. I did this project with the girls in Summer 2011. It was the last project and school started up. I just never got back to it. They seemed to enjoy this quite a bit. I had come across a CD mandala project on both Art Projects for Kids and Mrs. Picasso's Art Room

I gave the girls a little background on mandalas. The wiki explanation of mandalas compares Buddhist and Hindi mandalas with rose windows in Christian churches. That was the perfect thing for me to discuss with the girls. It piggybacked well with the stained glass project we created earlier in the summer. I didn't get into a major discussion on the symbolism in mandalas. I just explained to them that there are other religions besides Christianity and Buddhism and Hinduism use mandalas as part of their religion, like Christians use stained glass windows. It was the easiest way I felt I could explain this to the girls. I showed them these examples (sorry, I don't have the sources anymore, but I did find them through a Google Images search for mandalas).
 
 
Instead of explaining the symbolism behind mandalas, I spent more time discussing the characteristics of the mandala. The circular shape, the pattern all the way around. I showed them examples from both of the blogs above. And then we got busy!

I started by dividing the CDs up into even spaces for the girls. I just used a permanent marker to draw the lines on.
This is how the girls found their workspace when I started the project:
After explaining to them that they would be creating the same pattern all the way around the CD. I gave them the paper with the "pie" piece drawn on it. I asked them to draw out a pattern, anything they wanted. Since we were using permanent marker on the CD, I wanted them to work their ideas out first.
I even had them color in their pie piece first so they knew what their colors would look like before starting on the disc.
Then I had them repeat their pattern on the disc with a fine-point permanent marker.
Here was my 5 year old's disc before coloring in:
And my seven year old's:
And finally, they colored in their mandalas. I gave them the option of continuing a pattern on paper outside the disc. But they both were tired after just doing the disc so we kept it at that. I used glue dots to adhere the discs in their art journals.
Here are the finished pieces:

Friday, April 27, 2012

2012: Element Project: Color/Value Project (sort of)

Our other project last weekend was more complicated and more involved than many of our more recent creations. I was going for a project that might take a bit of time to complete while my youngest child napped. This project is conducive to talking about some of the Elements of Art: shapes, color, value, space, and line. We created these lovely paintings that I put up on our art room wall:
Top: My 6 year old's, Middle: My 8 year old's, Bottom: Mine :-)
We kind of combined two projects I found. One project inspiration has a similar layout to what we created but was about color value (the light and dark of one color). You can see in the photo above that I tried this project as it was supposed to go with my purple circle picture. But as many projects go, we had to adapt and change as we went along. The other inspiration came from the Art is the Best Part of the Day Blog. In their project, they picked two primary colors and created analogous color images and added white along the way to lighten some of the colors.

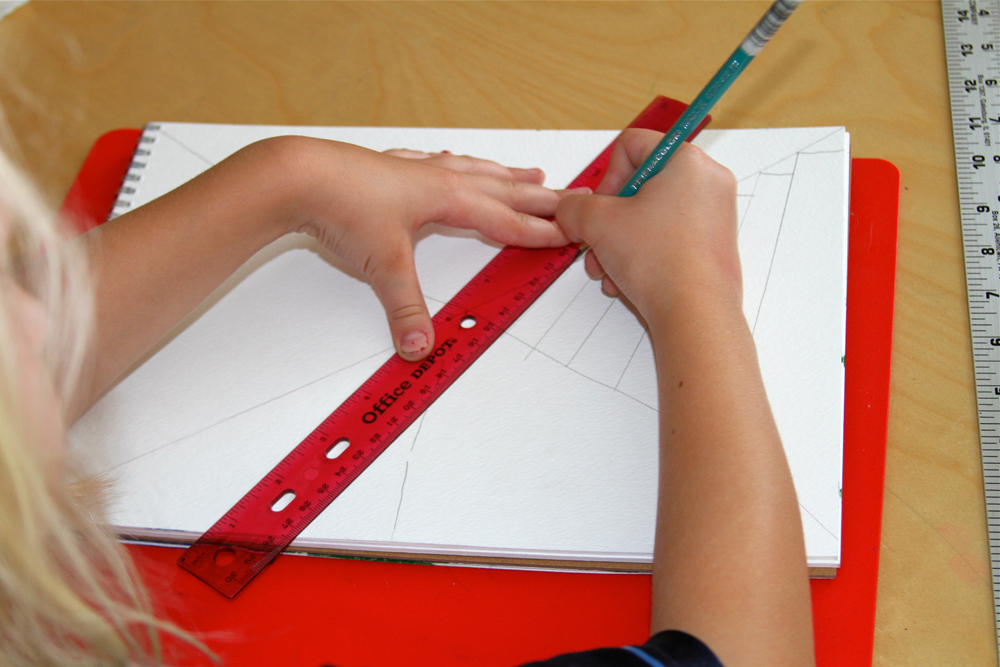
Okay, let's start with the first part of the project. Creating a shape and lines.
We used a ruler, pencil, and oil pastel to make a shape in the center, then drew only vertical and horizontal lines to fill in the paper. I experimented with black crayon and pastel and thought the pastel would resist the paint a bit more. So we went with that. I'm sure black crayon would work almost as well and be a cleaner alternative.
My original plan was for us to use one color and just keep adding white to create a color value image. However, this was the first time we used our new Biocolor paints. I experimented with the paint a bit while the girls were busy drawing their shape and lines. I was a little disappointed in how the paint covered the space on the page. It was not nearly as opaque as I was hoping for. And you could really see the brush strokes. Also, when I mixed in the white, I had to mix in a LOT of white to get a significant enough value change to show up on the paper. After discovering all this, I decided it would be better for the girls to pick two colors and mix them to create analogous color paintings instead of value paintings.
Isn't it cute how hard they are concentrating and how thoughtful they are while they are working? :-)
Here are their finished paintings:
Lily picked magenta and yellow. I had her paint 8 spots with each raw color. Then I had her mix those two to get an orangey color. After that, she mixed white with each of the three colors to get a lighter version. Hers worked out pretty well!
Ella picked turquoise and red. But when we mixed the two together, we did not get a purpley color as we thought. We got more of a gray muddled color. So she "cheated" a bit and just used the purple paint to fill hers in. She also added white to the three colors to get different values.
Here is my "value" painting. I added a bit of black to get one shade darker than the raw purple color from the bottle. And then I added white several times to get the lighter shades. I also went over my color blocks 2-3 times with the paint drying in between each time. This gave it a much more opaque finish and didn't look quite as watercolor-y. Although, I was a bit disappointed and frustrated at first (I didn't show this to the girls), we adapted the project and it worked out. Now, we have some nice artwork for the art room wall. Once it was underway, this was a fun project.

Wednesday, February 22, 2012

Toddler Activity: Learning Colors Through Play

Image from Color Maniacs
You're never too young to start learning colors! And actually, it would be quite a feat for me to teach my 26 month old colors at this point because he is still mostly nonverbal. Even though he only says a few words, he is successfully using the sign for "more" so I'm trying to teach him a few more signs. Only really elementary signs because that is the extent of my sign language knowledge. We're working on 'please', 'thank you' and a few other things. And I'm throwing colors in there too. It would be so cool if he could know his colors by signing and sorting before he can even say the words.

I've approached this in two ways. I started to focus on one color every week or so and I pull toys from our stash that are that color and set them aside (he doesn't see them unless we're doing this activity). I try to pull them out everyday for him to play with. He's not one for sorting or really investigating. He just wants to DO something with them. So I came up with having him drop them in the hole in the bottom of a diaper box and also use the slot in a toy mailbox we have. He loves trying to see if the pieces fit. As he's dropping them in, I say things like, "You have the red block. You're dropping the red block into the box." And as I say the color, I sign it. The awesome thing is that if you don't know sign language you can just google the word you're looking for and find out what the sign is, just like that!
I got the white basket and the pipe cleaners (on the table in the background) at the dollar store. I have him slide the pipe cleaners into the side of the basket. I love that there are different size holes so right now he can put them in the larger ones. As his fine motor skills get better, he can try for the smaller holes.

Another activity that he REALLY seems to like is playing with Prism bricks on the light table. If I give him the whole set he tends to just throw them around (I think this is his way of telling me he's overwhelmed). So I've just been giving him the 2 x 2 bricks. He loves to stack them up over and over again. He also just puts them all one by one on the board that comes in the Prism brick set. As he stacks each brick, I sign and tell him the color.
  
You could also talk about color mixing with the blocks (primary colors, secondary colors, complementary colors).
You can go over the colors of the rainbow.
 
It's funny, we have a ton of Duplo and Mega Bloks that he has never really seemed interested in. But the Prism Blocks seem to hold his attention. Maybe it is the added sensory experience of the light table with them.
I realize that these activities are not innovative in the world of toddler activities. And I know some people do these sorts of things with their kids from the time they are babies. But he is a third kid and was very happy to just play with whatever was around him until he turned 20 months or so. So I just went with it. And now that the girls are both in school all day, I have more time to do these things with him. He also had absolutely no attention span for anything remotely constructive (or maybe it just took me this long to figure out how to engage him for longer than 30 seconds) until recently. He will do these for at least 20 minutes at a time.

What do you do to introduce color to your little ones? :-)