I typically have birthday parties here at our house. I come up with a theme, throw a couple games together, feed the kids, let them play and then be done. I also decided a couple years ago that I would do planned birthday parties for our kids until after their 7th birthday. After that, they can pick a couple friends and we'll go do something fun like the rides at Mall of America (or equivalent).
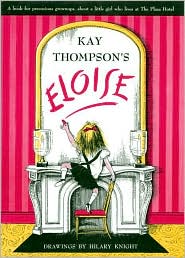
This year, I went more overboard on the party decorations than I usually do because I was so excited about the theme! My daughter loves the Eloise books, she has blonde hair, and loves the color pink! AND she was turning six this year! All of this combined made me decide to do an Eloise-themed birthday party. Can I just say, I LOVE LOVE LOVE
Pinterest! I never would have come up with any of these ideas without it!
If you are not familiar with the
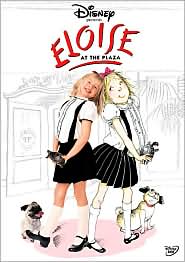
Eloise books and have a daughter in kindergarten, you definitely should check them out! Very cute! There are two movies on DVD as well that my daughter enjoys watching.


These two images on Pinterest definitely inspired me for the party:


I bought striped scrapbook paper just like this and copied the invitation almost exact. I used a circle scrapbook punch to cut out the circle and just cut a diagonal line to make the door hanger look like a door hanger.

Each girl had their own place complete with their name on a place card.

And an Eloise water bottle. I just took the water label off. Cut strips of the invitation paper and used the adhesive already on the bottle to stick the paper on. I printed Eloise images on the computer used my circle punch to cut them out and glued them on top of the paper with a glue stick. Quick note: I also made all the tissue paper puff balls for the decorations. Super easy to make with an online tutorial.

There's my birthday girl in her zebra skirt! She loves zebra print, so I went with that for the dinnerware theme. She was a little embarrassed when my husband came downstairs dressed like a fancy waiter:

Embarrassed enough to cry and tell him to take the tux off (he actually bought the tux for $50 back in our college days--and it still fit him!). Luckily, guests started arriving before anything could be negotiated so he kept the tux on. And guess what all the girls LOVED it! He served them dinner and they got the biggest kick out of it.

That's sparkling juice by the way ;-)


Cheers to Lily's Birthday!
The food for the party. Usually, we just order pizza and have go-gurt and juice boxes for our birthday parties. But, somehow, that didn't seem worthy of a Plaza hotel dinner. So I decided to do easy, yet fun and fancy food. I also considered the fact that the birthday girl has an allergy to peanuts. I made almond bark pretzels with pink sprinkles--using vanilla flavored almond bark that actually said on the package (NOT processed in a factory with nuts! Whoo hoo!).

Their appetizer was strawberries and grapes with strawberry shortcake yogurt cups to dip it in (totally stole this idea off Pinterest as well):

Then I made pizza bites both cheese and pepperoni. These are sooo easy. I was just hoping the girls would like them. And turns out they LOVED them! The recipe can be found at this link:
Pepperoni Biscuit Bites.

Finally, in lieu of a cake, I decided to do something completely different! We have a great donut bakery near us called
YoYo's Donuts. And it is completely peanut/treenut free! They've made donut cakes before, and originally I was thinking of getting a donut cake. But I wasn't sure what shape it should be in for an Eloise party. Then I thought of cake pops...and why couldn't we do donut hole pops! The bakery was kind enough to oblige my request!

They came to me just stuck in a styrofoam cirle. I added the ribbon around the bottom. Stuck tissue paper in-between the pops. Printed out a little Eloise on paper and stuck her in the middle. Volia! An Eloise donut pop centerpiece! I had them do a sprinkle covered long john as well so we would have something to put candles in:

We had a pinata for one of the games. And my 8-year old daughter actually came up with a party game all on her own: Pin the Bow on Eloise's Head! My husband printed this out on several sheets of paper and taped it together. I quick drew and cut out a bow for each girl with their name on it so we would know which bow belonged to which child.

I have to say. I had a fantastic time putting this party together. But I love doing this kind of thing. I wasn't sure how the "fancy" dinner would go over with six and eight year old girls. But they absolutely LOVED it! I got some feedback from a couple of the moms too. They both said that their girls had a great time and loved that it was quieter and not so crazy for a birthday party! In this day and age when I feel like most people do parties at bouncey places, Chuck E Cheese and the like (and there is absolutely nothing wrong with that. My kids love those kinds of parties!), it made me feel really good to know that kids can still have fun and enjoy a low key birthday party at our house! And I felt like all my effort was worth it and that Lily had a really fun 6th birthday.
 LOVED the idea of Christmas "experiences" to count down to the big day, versus getting candy or just a random something or other, or just flipping open a flap. And then I saw this:
 And thought what a cute way to display an advent calendar. I also happened to have some Christmas scrapbook paper laying around I was going to use for something else. I decided not to do that project this year, so the paper would be perfect for this. Pink Suede Shoe has a whole tutorial for making these trees. I altered it a bit and made my own template because my paper was smaller.


 I stuck little pieces of paper with the day's activity or statement in the cone before adding a paper circle to the bottom. I did put candy in one cone and little Christmas erasers in another. I just used four glue dots on the bottom of each cone to adhere the white circles. Then, the kids can easily remove the white bottom and hopefully we can reuse the cones from year to year.
 We displayed our cones on a bookshelf. Here they are waiting for December 1st to open the first one.


 My cutie wanted to pose in a photo as well, so how could I not post that one too. ;-)